Steps to start app and start Hello world - displays plain file


#1

A managed to follow steps in Chpt 3 and get the initial ‘It worked’ page to display.

Now I am proceeding with Chpt 4 and have created templates, index.html, updates urls.py and views.py.

First I am unclear how to start my environment, etc. so my web app will display. My guess is as follows:

  1. go to projects/project folder
  2. set virtual environment $ virtualenv vena
  3. activate $ source venv/bin/activate
  4. start git $git init
  5. python manage.py migrate
  6. start web server $ python manage.py rumserver

Second, I did the steps described in chapter 4 pages 12 - 15. But when I go to localhost:8000 it displays the content of index.html as plain text showing the html tags, etc. i.e. it is not interpreting the html.

I am running on a MacBook Pro with macOS High Sierra 10.13.2. and using Safari 11.0.2 to browse.


Could Someone Give me Advice on Structuring a Complex Django Project with User-Generated Content?
#2

Yay my forum works again! Thanks for your patience. :)

That’s an interesting error.

A couple questions:

  • What does the output in your terminal look like? From where you run runserver
  • Can you paste in what your views.py looks like?

Thanks!


#3

Hi Tracy.

First here is what I do to start:

Last login: Tue Jan 16 15:55:54 on ttys000
Stevens-MacBook-Pro:~ stevencooke$ cd projects
Stevens-MacBook-Pro:projects stevencooke$ cd myhellowebapp
Stevens-MacBook-Pro:myhellowebapp stevencooke$ virtualenv venv
New python executable in /Users/stevencooke/projects/myhellowebapp/venv/bin/python
Installing setuptools, pip, wheel…done.
Stevens-MacBook-Pro:myhellowebapp stevencooke$ source venv/bin/activate
(venv) Stevens-MacBook-Pro:myhellowebapp stevencooke$ git init
Reinitialized existing Git repository in /Users/stevencooke/projects/myhellowebapp/.git/
(venv) Stevens-MacBook-Pro:myhellowebapp stevencooke$ python manage.py migrate
Operations to perform:
Apply all migrations: admin, contenttypes, auth, sessions
Running migrations:
No migrations to apply.
(venv) Stevens-MacBook-Pro:myhellowebapp stevencooke$ python manage.py runserver
Performing system checks…

System check identified no issues (0 silenced).
January 16, 2018 - 21:00:47
Django version 1.9.6, using settings 'hellowebapp.settings’
Starting development server at http://127.0.0.1:8000/
Quit the server with CONTROL-C.

View.py is as follows:

from django.shortcuts import render

Create your views here.

def index(request):

this is my new view

return render(request, ‘index.html’)

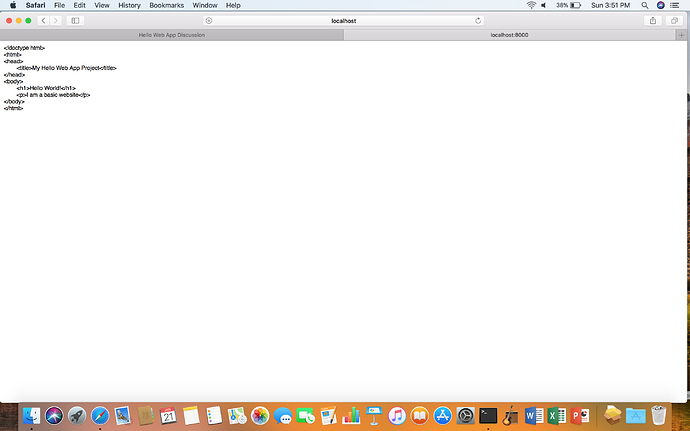
What displays in Safari is literally the following:

<!doctype html>

My Hello Web App Project

Hello World!

I am a basic website


#4

Oddly it is almost displaying correctly in the discussion page, but it is just displaying plain text including the html tags in my browser when I do localhost:8000. Let me try again to show you.

<!doctype html>

My Hello Web App Project

Hello World!

I am a basic website


#5

I tried to use Shift Control 3 to snap shot what is showing in Safari, but it still comes into this discussion as him text and gets interpreted as html. Oh well, hopefully what I am able to show you gives some insight to what I have done.


#6

There might be a problem with indentation, and this forum might be messing it up. Try taking your views.py and index.html code and putting them into pastebin.com and then send me the link to the pastebin. Looks like your runserver output is fine so I don’t need to see that. :) Let me know if you have trouble and I can make a little video.


#7

Hi Tracy

The link to pasterbin for views.py is https://pastebin.com/2YK5CrfS

The link to pastebin for index.html is https://pastebin.com/eJniR88A

I hope this helps.

Steve


#8

Maybe this is the link I am supposed to send.

https://pastebin.com/u/sdcooke


#9

I believe I need to do steps to start vitualenv etc. Do I also need to do the dang command to startapp every time I restart? I am assuming not since it create files that we have modified. But I am just asking as I recall reading that the browser will not understand my html in index.html without Django translating it. Is this the problem?


#10

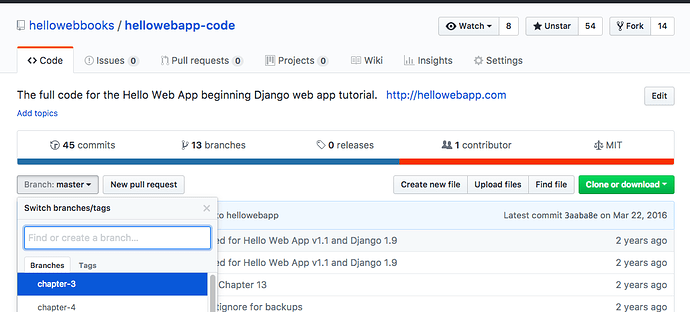
Thanks for sending along! I forgot to mention that at any time you can check your code at https://github.com/hellowebbooks/hellowebapp-code — you can click on “Branches” to change the chapter to see what your code should look like:

So everything looks good there.

As for your server stuff, you don’t need to do startapp every time, but yes Django needs to be running (that’s what the python manage.py runserver) business is about in your terminal.

Django can’t run unless you’ve started your virtual environment, so that needs to happen too.

So when you start development the next day, just need to open your terminal, change directories to your project, start your virtualenv so the “bubble” shows up on your command line, and then start your server (the runserver command). Then in your browser you can type in localhost:8000 and you should see your blank webpage.

Try running through all of the above again and see if the HTML correctly pops up. :)


#11

Thank you. I have bookmarked the hellowebapp code site.

I am sure that I have done exactly what you have stated several times now, but I will try again. I am also thinking I should undo everything I changed and see if I can still get it to display the original page from Chapter 3 (the one that displays after the initial setup before I started creating index.html, etc.

I will let you know what happens.


#12

I don’t think you have to do that, but at the very least that’ll be good practice. :)


#13

Hi Tracy.
I did try once again (a few times) as follows
1.'cd projects’
2. 'cd myhellowebapp’
3. 'source venv/bin/activate’
4. go to Safari - it consistently displays my html file but as text with the html tags showing (not being interpreted)

So I looked at settings, views and urls again.
I noticed that in url patterns section of urls py file, the book has a line that says:
" url(r’^admin/’, include(admin.site.urls))," but my file had
" url(r’^admin/’, admin.site.urls) " so I changed it to be like the text but I got an error when I ran run server saying it did not recognize ‘include’ so I reverted back to the original without ‘include’,

Next I undid what I had added to views and urls py files, stopped and restarted run server then went to Safari, and now I am back where I was, successfully seeing the Django ‘It worked’ page properly formatted ike the screen shot in Chapter 3.

So moving on, into Chapter 4 I believe I am doing EXACTLY what the book says, but somehow my HTML file is not being interpreted as HTML. It is just displaying the contents of index.HTML as if it was just a plain text file, ignoring the HTML tags.

I am really at a loss as to how to solve this. I know I am running Django 1.9.6 and Python is 2.7. So I don’t think this should be a versioning issue.


#14

Can you do two things for me:

  • Your index file you put in your templates folder, is it index.HTML or index.html?
  • Can you make a screenshot of your browser, including the address bar?

#15

Hi Tracy, I created the file as index.html (not with caps). Here is a copy of my browser. Although it shows localhost I actually included :8000


#16

Okay, we’re going to go with sharing all your files with me because I’m sure there is something simple we’re missing. To do this, we’re going to put your files on Github.

Have you used GitHub and git before? Here’s helper file I have: https://github.com/hellowebbooks/hellowebapp/tree/master/git-tips

Steps in case you’re new to git:

  • Install git on your system if you haven’t already (instructions in the helper file)
  • In your top level directory (the one with manage.py), type git init into your command line.
  • Then add your .gitignore file, the instructions are at the bottom of the helper file.
  • Then commit your files (git commit -a -m "First commit") (-a is “all files” and -m means “with this message”)
  • Then add your repo to Github with these instructions: https://help.github.com/articles/adding-an-existing-project-to-github-using-the-command-line/

Then send me the link to the public repository on Github. :) Then on my end, I can download your files and run it on my system and see if I can replicate your problem.

The above might sound like a lot but as a developer, knowing how to work with git and GitHub is pretty important so it’ll be good practice.

(And sorry if you know any of the above already, I’m just trying to cover all bases!)


#17

Hi Tracy,
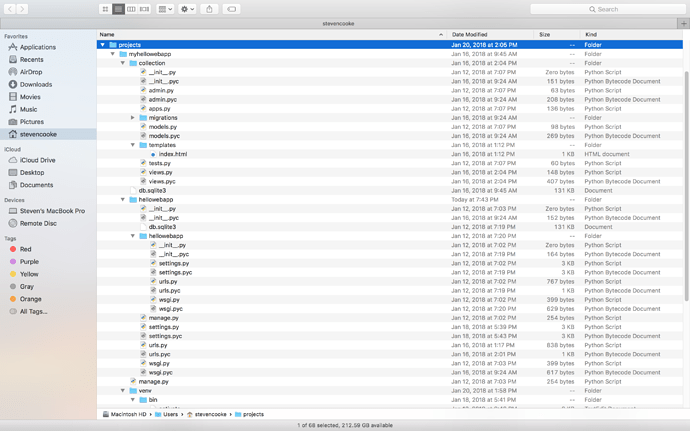
I will follow your instructions and send the files, but before I do, I was going over our instructions and saw that you have “manage py” at the top. I do not. I think I messed up my directory structure when following steps in the book to install and get stuff set up. To this post I am attaching a screen shot that shows my directory structure. You will see that my “manage py” is not at the top of the structure. Also I have multiple hellowebapp folders. So before I send you everything on github can you please tell me if my directory structure might be the problem? Thanks. Also if this is the issue can I just move things to their proper place or will the fix be more complicated than that?


#18

Yeah, that definitely could be the problem.

Since you’re early on, I’d wipe the folder and start over, and make sure to only do the startproject and createapp once each. When you’re done, look at the GitHub repo with the code and confirm that your structure matches the one there. :)


#19

Tracy,
Thank you. Below I have summarized the steps in your instructions to set up from scratch.
Once thing I am not certain about: Once I start the virtual environment, do I stay in it while I do the remaining first time setup steps. Or do I deactivate and then do the remaining steps? I think this may be what I messed up the first time. (I don’t remember if I stayed within the venv or not). i.e. once I am in my virtual environment, am I able to navigate to the top folder, etc.?)

Can you please clarify? Thank you.

  1. Mkdir projects
  2. Cd projects
  3. Mkdir myhellowebapp
  4. Cd myhellopwebapp
  5. $ Virtualenv venv
  6. $ Source venv/bin/activate
  7. $ Pip install Django==1.9.6
  8. $ Git init
  9. $ django-admin py startproject hellowebapp .
  10. Go to projects/myhellowebapp
  11. $ django-admin py startapp collection
  12. Go to projects/myhellowebapp\hellowebapp
  13. Add ‘collection’, to INSTALLED APPS list in settings py
  14. Go to projects/myhellowebapp
  15. $ python manage py migrate
  16. $ python manage py runserver

(NOTE I have purposely left out the period before py in the commands so it does not appear as a link in this discussion, which causes me to get auto-generated emails warning me not to include links, etc.)


#20

Hey Steve — please just follow the steps in the Hello Web App book. I hesitate to follow your steps here because I know that they’re correct in the books.

Regarding virtualenv, you should always be in your virtual environment when you’re working on your Django project.

Django will not work if you aren’t in your environment (your “bubble” that keeps you separate from the rest of your system), so don’t turn it off unless you’re done with working for the day (and then go back in when you start working the next time).

So, as a weird analogy — say you have a recipe that only works with a certain kind of oven. Your kitchen already has an oven, but you need this certain one. So you create a “virtual environment”, a virtual kitchen of sorts, and it has the oven you need, and it won’t conflict with your actual kitchen.

When you need to use that special oven, you need to enter into this special kitchen in order to access it. (Activating your virtual environment for your project.)

This is useful in case you work on special recipe #2, which needs it’s own, special, different oven. So you can create your own kitchen for that recipe, and it won’t conflict with other kitchens you have.

Virtual environments give a bubble to install things (like Django) so they don’t conflict with your system, or other projects you have on your system. You need to be “in” that environment in order to access what you’ve installed there.

I hope that helps you understand!